Wednesday, April 15, 2009

Dynamically pick a database in cakephp.

While doing some research into sharding and cakephp I was looking for a way to change a model's database connection.

The docs specify in your models you can use:
var $useDbConfig = 'default';
which will find a matching variable in DATABASE_CONFIG and use the connection settings.

in database.php
class DATABASE_CONFIG {
var $default = array(
'driver' => 'mysql',
'persistent' => false,
'host' => 'localhost',
'port' => '',
'login' => 'myuser',
'password' => 'yeahright',
'database' => 'mycake',
'schema' => '',
'prefix' => '',
'encoding' => ''
);
...
}

Note: Difference between Sharding and Partitioning is shards resides on different servers. However both separate data depending on some field or attribute.

So to make this dynamic you start in bootstrap.php and create a hashing alg like this to separate your data:
$shardId = $id % 10;
$shardHostArray = array(5 => '192.168.0.25');

Configure::write('shard.host', $shardHostArray[5]);
or a
define('SHARDHOST', $shardHostArray[5]);
The next change you make is in database.php.

Add a constructor to class DATABASE_CONFIG
 public function __construct()
{
$this->shard = $this->default;
$this->shard['host'] = SHARDHOST;
}
Now when you have a model in cakephp such as GroupModel that you want to shard. You specify:
var $useDbConfig = 'shard'; // this is the name of a class member in
// DATABASE_CONFIG. I created this var in
// the above constructor.
And the correct server address will be used. This allows you to stay within the cakephp conventions and not break the schema caching.

Tuesday, April 14, 2009

Friday, April 10, 2009

rake db:migrate error when using differing libmysql.dll and mysql servers

I'm using a fedora mysql server, while the ruby server runs off of windows. the libmysql.dll form my previous post came from a 5.1 windows mysql server.

The version mysql server on fedora is 5.0. This caused the following error:

D:\workspace\rubytest>rake db:migrate
(in D:/workspace/rubytest)
rake aborted!
Mysql::Error: Commands out of sync; you can't run this command now: SHOW TABLES

(See full trace by running task with --trace)

Solution:
get the mysql-noinstall 5.0 server and copy the libmysql.sql into /ruby/bin

ERROR: While generating documentation for mysql

Error while running the command
gem install mysql
in windows xp

Produced this error:

C:\>gem install mysql
Successfully installed mysql-2.7.3-x86-mswin32
1 gem installed
Installing ri documentation for mysql-2.7.3-x86-mswin32...
Installing RDoc documentation for mysql-2.7.3-x86-mswin32...
ERROR: While generating documentation for mysql-2.7.3-x86-mswin32
... MESSAGE: Unhandled special: Special: type=17, text=""
... RDOC args: --op d:/Ruby/lib/ruby/gems/1.8/doc/mysql-2.7.3-x86-mswin32/rdoc -
-exclude ext --main README --quiet ext README docs/README.html
(continuing with the rest of the installation)

Solution:
set path=%path%;c:\mysql-5.1.33-win32\bin\

I then copied the libmysql.dll from the above bin into the ruby bin (I'm not sure this is necessary, but it was one of the steps). Note copying the libmysql.dll from the mysql tools did not work, it has to be from the mysql server files. An easy way without installing mysql server is to use the mysql noinstall zip.

I then ran the command
gem install mysql --no-rdoc

I still get an error if I run gem install mysql, but with the no-rdoc the ruby server is able to run.

You can now delete mysql-noinstall and your site should work.

Tuesday, January 6, 2009

Setting up cruisecontrol on fedora 10 linux

Tested using cruisecontrol-bin-2.8.1.zip
Fedora 10
Java Version: openjdk and openjdk-devel rpm

I had some problems going through the Getting Started tutorial for cruisecontrol, so here is what I did to get it working. The version we're downloading works as is and you don't need to run the install.sh as suggested. Except for a few environment variables that need to be set, it's ready to go.


Step 1
As root (cause i'm lazy and don't want to type in sudo every time, also environment variables need to be viewable by the scripts and if you set them in [yourusername] they won't appear when you run the cruisecontrol service as root)

unzip cruisecontrol-bin-2.8.1.zip -d /opt/ ln -s cruisecontrol-bin-2.8.1 cruisecontrol

Step 2
These next two environment variables are necessary or else exceptions will be thrown. You will need to find your home directory for java as it's usually symlinked to the one in /usr/bin/java. I tracked Fedora's java to

lrwxrwxrwx 1 root root 22 2008-05-17 04:59 /usr/bin/java -> /etc/alternatives/java lrwxrwxrwx 1 root root 46 2008-12-07 16:21 /etc/alternatives/java -> /usr/lib/jvm/jre-1.6.0-openjdk.x86_64/bin/java

BASH
export JAVA_HOME='/usr/lib/jvm/jre-1.6.0-openjdk.x86_64'

TCSH
setenv JAVA_HOME /usr/lib/jvm/jre-1.6.0-openjdk.x86_64

Step 3
The other environment variable that needs to be set is
ANT_HOME

I recommend using the ant provided in the cruisecontrol directory. If this environment variable is not set an error like this appears:

log.xml does not exist.
or
The specified logger class net.sourceforge.cruisecontrol.builders.AntProgressLogger could not be used because Class not found: net.sourceforge.cruisecontrol.builders.AntProgressLogger

setenv ANT_HOME /opt/cruisecontrol/apache-ant-1.7.0

Step 4
Run cruise control
cd /opt/cruisecontrol ./cruisecontrol.sh

Step 5
This should now begin the cruisecontrol web server and you should be able to see the dashboard
Visit these URL's
http://localhost:8080/dashboard http://localhost:8080/cruisecontrol http://localhost:8080/cc-config

For some reason the current version of cruisecontrol gives a 404 error when visiting http://localhost:8080 . Older versions if cruise control redirect you to the correct place.

Wednesday, December 31, 2008

Setting up BIND on Fedora 10 with wildcard subdomains

Here is how I set up a domain name server with BIND on Linux Fedora 10.

One of the features many websites use to personalize their content is to give users their own domain name, for example bunwich.blogspot.com or bunwich.mysite.com. This technique is called wildcard subdomains. In this tutorial, I'll be explaning how you can configure a nameserver to resolve all these addresses to the same server. You'll need to use mod_rewrite and .htaccess to parse the data, and the scripting language of your choice to refine the arguments even more. (I'll write these later ones when I have some time.

Tested on:
Linux LAMP Server (I'm using Fedora 10) as a guest OS on VMware
VMWare Server 2.0 is on Windows XP

Using yum or any GUI add/remove software program, install these rpm's:
  • bind-chroot

  • rpm dependancies should automatically add the bind rpm's

  • system-config-bind - a not so intuitive gnome tool to setup your DNS server. I'll paste the output files that it produces in case you want to do it all by hand.

Files and directories that will be modified:
/etc/named.conf - contains the zone, ie the domain we'll be working with
/etc/resolve.conf - the address of the nameserver we'll be using
/var/named/chroot/var/named/ - directory of where the system-config-bind writes all the zone files to.

mysite.com is the domain I'm going to use to refer to my server.

Step 1
Make sure your firewall has port 53 open and you can connect to the internet. Start and stop your DNS server by running the command
service named restart. You should receive OK messages.

Step 2
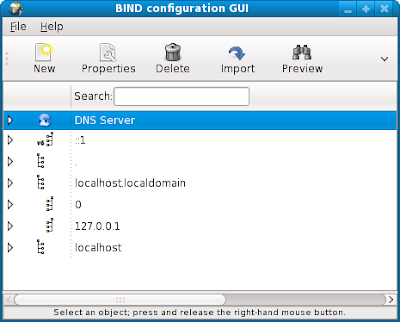
run system-config-bind - here's a picture of the GUI

Step 3
What we want to do next is to get our domain name server to resolve to an IP of our choice. I'm going with my lan IP as I'm using this for testing.
mysite.com -> 192.168.100.10 . (No disrespect to the real mysite.com as we'll be redirect users to your own server - people must be using your dns server for that to happen)
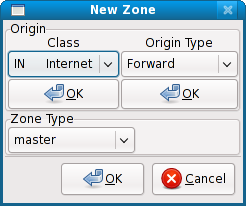
Highlight DNS Server and click on New -> Zone
A new window will pop up.
Click on the two OK's at the top. Your options should be
Class In Internet and
Origin Type Forward
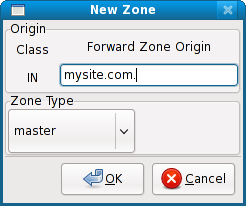

You will get this window.
Enter your domain. In our case:
mysite.com.
Make sure mysite.com. has a period after the com.
Click on OK.
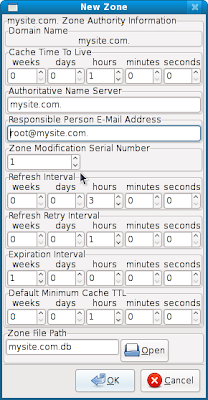

Take note that the period is added to the end of mysite.com.
Click on OK

The last field has mysite.com.db this will contain your zone and ip information for your server which may be found in /var/named/chroot/var/named/mysite.com.db

On the main GUI click and the Save Button. The .db file will be written.

Step 4
Associate our name server to an IP.
On the main GUI, make sure mysite.com is highlighted. Click on New and choose:
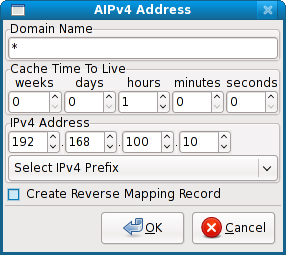
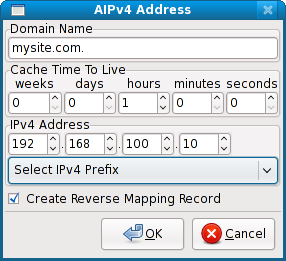
A IPv4 address. The pop up on the right will appear. Enter your ip address. Note that the domain name mysite.com. has a period on the end too. We select Create Reverse Mapping record for our ip and a zone will be created for it on our name server.

On the main GUI click on the Save button.


Step 5
We now have our name server setup and we should be able to ping and nslookup mysite.com

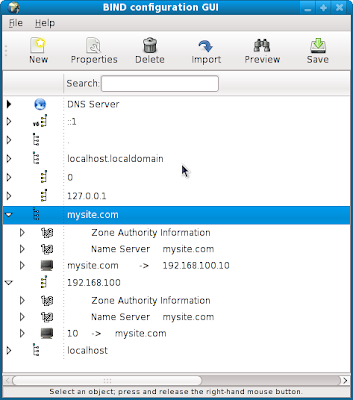
Here is how the main GUI now looks


Step 6
Finally the wildcard setup. Right click on mysite.com, add a new A IPv4 Address. Fill in the info with a wildcard and deselect Create Reverse Mapping Record. Refer to the image on the right.

Save and run
service named restart

Step 7
Make sure you edit /etc/resolve.conf to use your name server
I have
search localhost
nameserver 127.0.0.1
Note: if you're using network manager or system-config-network, add 127.0.0.1 as your name server.

Done!
You should now be able to ping and nslookup mysite.com or ftp.mysite.com and be directed to 192.168.100.10. As long as those computers use this nameserver.

Next time I'll go mod_rewrite and htaccess that will help you setup wildcard subdomains

As promised before here are the configs in the conf and zone files.
/etc/named.conf
//
// named.conf
//
// Provided by Red Hat bind package to configure the ISC BIND named(8) DNS
// server as a caching only nameserver (as a localhost DNS resolver only).
//
// See /usr/share/doc/bind*/sample/ for example named configuration files.
//

options {
listen-on port 53 { 127.0.0.1; };
listen-on-v6 port 53 { ::1; };
directory "/var/named";
dump-file "/var/named/data/cache_dump.db";
statistics-file "/var/named/data/named_stats.txt";
memstatistics-file "/var/named/data/named_mem_stats.txt";
allow-query { localhost; };
recursion yes;
};

logging {
channel default_debug {
file "data/named.run";
severity dynamic;
};
};
zone "100.168.192.IN-ADDR.ARPA." IN {
type master;
file "192.168.100.db";
};
zone "mysite.com." IN {
type master;
file "mysite.com.db";
};
zone "." IN {
type hint;
file "named.ca";
};

include "/etc/named.rfc1912.zones";

/var/named/chroot/var/named/mysite.com.db
$TTL 1H
@ SOA @ root ( 4
3H
1H
1W
1H )
NS @
IN 1H A 192.168.100.10
* IN 1H A 192.168.100.10

/var/named/chroot/var/named/192.168.100.db
$TTL 1H
@ SOA mysite.com. root.mysite.com. (3
3H
1H
1W
1H )
NS mysite.com.
10 PTR mysite.com.
That's all.

Friday, November 7, 2008

Fedora 9 and mouse clicking problems

After a recent yum update around early November 2008, my mouse clicking started to have problems. Clicking on icons in the panel would not launch xterm, and clicking on the title bar of windows would maximize them. I also clicked on the Application menu in the panel and they would instantly close.

This was odd mouse behavior.

What I finally discovered is that although I was single clicking, linux was registering them as double clicks.

Changing nautilus or gnome settings didn't affect anything.

After reading this post

http://groups.google.com/group/linux.debian.bugs.dist/browse_thread/thread/36589b112565db28

they suggested that x was registering clicks on multiple mouse devices. For me it was /dev/input/mice an /dev/input/mouse0. This caused a single mouse click to be repeated.

in my xorg.conf i had the line
Option "Device" "/dev/input/mice"

I changed it to

Option "Device" "/dev/input/mouse0"

and it solved the problem.

/dev